
Lower Quadrant
SEMAPHORE SIGNALS - LOWER QUADRANT
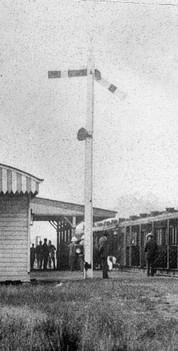 The 1879 Railway Rule Book shows that the signals to be used on Western Australia's Eastern Railway were of the slotted post type (see graphic below). The Rule book defined them as being of two types: 'Station Signals' and 'Distance Signals' and their indications were described in the following Rules:
Semaphore Station Signals by Day.
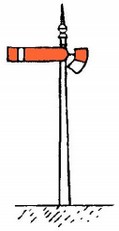
Rule 52. The Signals are constructed with two Sempahore arms - one for the Up, and the other for the Down Trains.
Rule 53. The Signal invariably made on the Left hand side of the Post as seen by the approaching Engine Driver.
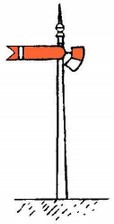
Rule 54. The Danger Signal to stop is shown by the Arm being raised to the horizontal positon (left hand picture);
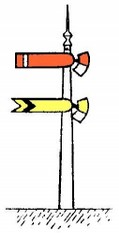
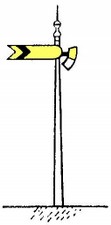
Rule 55. The Caution signal to Slacken speed is shown by the Semaphore Arm being lowered to an angle of 45 degrees (centre picture);
Semaphore Station Signals by Night.
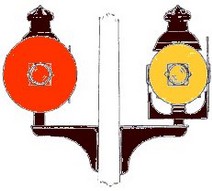
Rule 56. The Signals by Night will be made by Lamps affixed to the Station Semaphores, showing Red, Green, and White Lights.
Semaphore Distance Signals by Day.
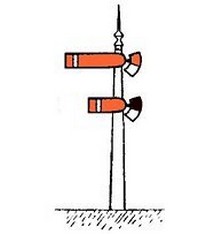
Rule 57. The Distance Signal Posts have but One Arm, which is only intended to work to All Right and Danger. When the Arm is in a horizontal position it indicates that the approaching Train is to Stop; and when lowered within the post it means All Right (right hand picture).
Semaphore Distance Signals by Night.
Rule 58. The Distance Signal Posts are furnished with Lamps showing two Colours by Night, as follows:-
The All Right Signal to proceed is shown by a White Light.
The Danger Signal always to Stop is shown by a Red Light.
These Lamps are also furnished with two back lights, White and Green.
The White Light denotes that a White Light is shown in front, and the Green back Light denotes that a Red Light is exhibited in front of the signal.
Three years earlier, in 1876 the signals and their indications as described above had caused a major rail disaster in England at a place named Abbots Ripton. This crash there was due to a signal 'arm' literally freezing into the 'Clear' position inside the signal post. In those days, the signal was 'hidden' from the driver of a train if the section was 'clear' and only revealled (horizontal) if the train was required to 'Stop'. It should be obvious that the worry about a signal freezing into the post was not a major deciding factor for using these signals in Western Australia!
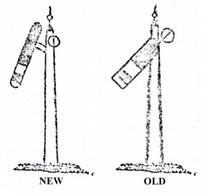 Nevertheless, the railway department changed the standard design of the signals in use here and in 1896 publiahed a diagram of the 'new' type of signal which had a separate 'spectacle plate' (to hold the coloured glasses for night-time indications), and the 'old' type which had an all-in-one arm and spectacle. The 'new' signal shown at right was of the 'somersault' type developed in England following the Abbots Ripton disaster.
It is known that another signalling contractor named Saxby and Farmer also supplied signals to Western Australia's railways. These ended up on the private Great Southern and Midland Railway lines and were typically mounted on wrought-iron Lattice posts with heavy base castings and 'all-in-one' signal arms and spectacle plates
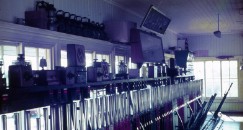
The two-position, lower left-hand quadrant semaphore signals used by the Western Australian Government Railways from the late 1890s were provided by the well-known supplier of signalling equipment McKenzie and Holland. This company, a major 'player' at the time, also produced the lever frames for signal cabins - even having an influence over the design of the cabins themselves. The company had several factories in Australia to keep pace with the needs of many 'colonial' railways in Australia and abroad.
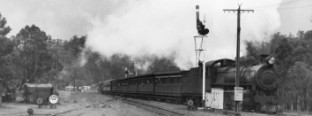
The present operational railways in Western Australia no longer employ these signals on any line, but they can still be found in use at some preserved railway sites, most notably, at the Bennett Brook Railway in Whiteman Park, Caversham.
The description of the signals and the graphic representations below provide a general education on their individual function, but the reader is encouraged to find examples on other pages of this site to see actual photographs of such signals.
Sometimes, the arrangement of these semaphore signals seem in the least 'impressive', but sometimes 'daunting' - the general rule of 'reading' these signals in the case of more than one signal being on a post was that were to be read: 'Top to Bottom - Left to Right'. Usually, a Diagram of Signalling clarifies any confusion.
DISTANT Signal This signal is the first signal a Driver sees when nearing a station. This signal is NOT a ‘STOP’ signal – with the ‘arm’ in this position it is a ‘CAUTION’ signal, warning a Driver that the next signal may be at stop. There may also be a train between this signal and the next signal so Drivers need to be in full control of their train when passing this signal at ‘CAUTION’. |
|
HOME Signal This signal is the second signal a Driver sees when nearing a station. |
|
HOME / DISTANT Signal
|
|
Co-Acting Signal This type of signal is used when there is an obstruction, such as a footbridge, between the signal and an approaching train. This signal has two arms that are connected together and work as one. From a distance, the top arm is visible above the obstruction as the train approaches, whilst the bottom arm is near locomotive cab height, easily visible as the train nears. |
|
Calling-On Signal (As shown in the 1900 and 1940 Rules) A ‘Calling-On’ signal is a short-arm version of a ‘HOME’ type signal. It is positioned under a HOME Signal, and is used when there is a need to work a train into an occupied line - typically in station yards. A train arriving at such a signal would be brought to a stand at the signal and then the ‘Calling-On’ signal placed at ‘Proceed’ to permit the train to ‘pull forward’ as far as the line is clear. |
|
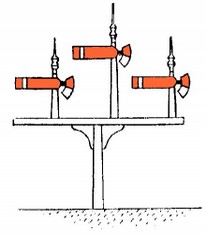
Bracket or Gantry Signals Distant and / or Home Signals can be arranged on a ‘bracket’ type post - used in stations where space between tracks is limited, or when there are many parallel lines to be signalled a ‘gantry’ is used. Gantries consist of two upright posts with the signals mounted on short upright posts called ‘dolls’ supported by long horizontal beams or girders. |
|
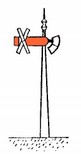
Signals ‘Out of Use’ Any Signal can fail, or need repair. When they do, they are marked with a WHITE CROSS affixed to the arm to signify that it is ‘Out of Order’ and should be disregarded. Signals in this condition do not have their lamps lit and therefore give no indication by day or night. Shunting Signals (as seen below) are usually covered with a bag when Out of Use. |
|
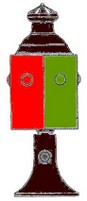
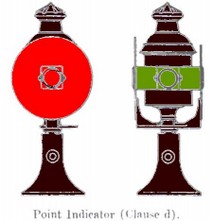
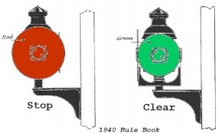
Shunting Signals These signals can be mounted on bases on the ground; fitted onto ‘HOME’ signal posts, bracket signals or gantries; or their own signal posts, and were used to permit shunting movements from, or between, main lines to sidings. They rotated horizontally through 90 Degrees, and when at ‘STOP’ the Yellow Disc faced in towards the signal post. |
|
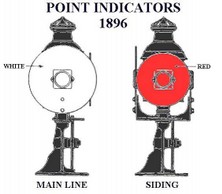
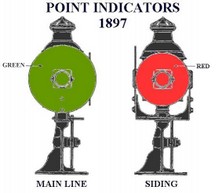
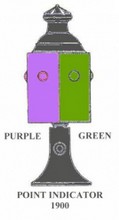
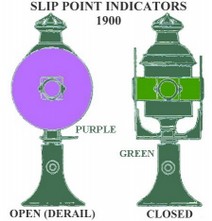
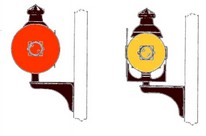
Changes of colours over the years | |
|
|
|
|
|
|
|
|
|
|


Information researched and interpreted by Chris. J. E. French of SignallingWA
Coloured graphics by Chris. J. E. French and W. A. G. R.
Buy this page or View your SignallingWA Shopping Cart
This page is copyright, and permission must be sought from SignallingWA before this page is used for any purpose other than personal education.